
I've been messing about with I-cord lately, and stumbled on what may be the easiest method ever for a simple 2-stitch I-cord. Here it is....

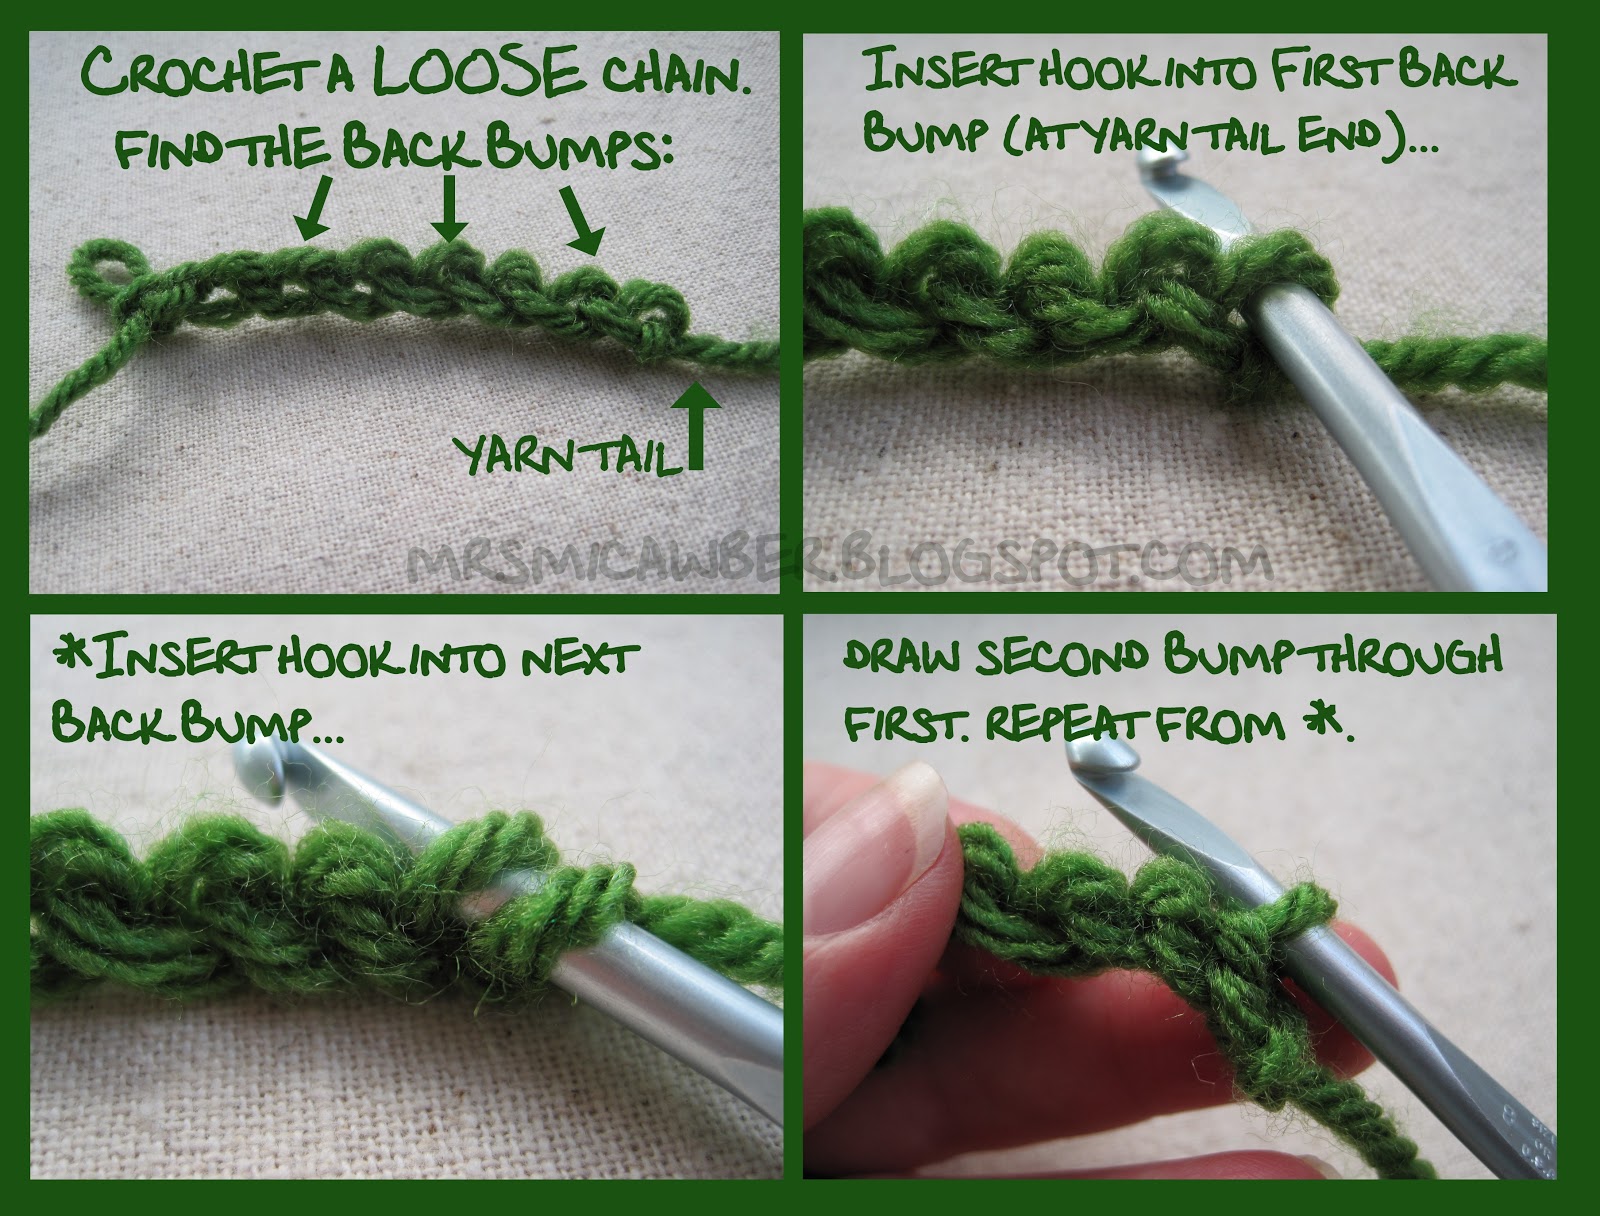
Step 1: Take some yarn and a hook, and make a VERY loose chain of any length. Remove the hook from the working loop.
With the starting tail in your hook-holding hand, and the empty loop in your yarn-feeding hand, turn the chain over so that the back bumps (or "back ridges") of the chain stitches are on top.
Now comes the crazy part. Let go of the yarn tail and the working yarn - you don't need them any more.
Step 2: Insert your hook from front to back through the first back bump, nearest the yarn tail. *Insert the hook from front to back through the next back bump (2 loops now on hook). Gently draw the second loop through the first. Repeat from *.

How crazy simple is that? Not to mention fun.
This Cord is Too Short! I Want More!
Okay - let's make it longer!
You've got an I-cord with two loops at the end - we'll call them the "yarny loop" and the "opposite loop". (The yarny loop is the one with yarn coming out of it.)
Insert your hook into the opposite loop, and gently tighten both loops until they're about the same size as the loops under them. Make sure the working yarn is behind and between the two loops.
To start the new Step 1 column: if desired, gently pinch the yarny loop with your yarn hand, just to keep it from pulling loose. Working on the opposite side, chain 1 with regular tension, then continue to chain Very Loosely to your desired length. (You can let go of the yarny loop any time after that first chain is made. It will just hang there until you're ready for Step 2.)
When your new Step 1 stitches are complete, turn the chain over as before. Insert your hook into the hanging-loose yarny loop, being careful not to twist it. Skip the small back bump (the normal-tension one) from the first opposite chain-1, and insert your hook into the next back bump. Work Step 2 as above.
 |
| Making the I-cord longer |
Now I can hear someone yelling:
My Back Bumps are Too Small! (or, My Cord is Too Tight!)
If your cord is too tight, there's not enough yarn in your Step 1 stitches. This is a tension issue.
To relax your tension, try any of the following:
Taking a warm bubble bath- Pinching the "back" yarn with your fingers while drawing the loop through on each chain stitch (being careful not to tighten the previous chain stitch)
- Using a large hook for Step 1 and a small hook for Step 2*
- Chaining around a hook or knitting needle to enlarge the back bumps (see video for example), then removing the hook or knitting needle before completing Step 2
*I-cord is amazingly forgiving stuff. I've worked Step 1 and Step 2 with hooks that were 4 to 6 sizes apart, and the cord came out beautifully even. A few tugs is all it takes to settle the loops.
 |
| Two ways to get looser tension |
Far away and faint, a voice is hollering:
Aack! My Cord Is All Floppy and Messy!
Floppy I-cord means there's too much yarn in your Step 1 stitches - also a tension issue.
To increase tension, try:
Thinking about American politics- Using a smaller hook
- Simply chaining a little more firmly
And Now for a Bit of Theory - How the Heck Does This Work?
In standard I-cord construction, stitches are worked in spiral rounds, one row/round at a time. But Crazy Simple I-Cord stitches are worked one column at a time. The first column is formed by the loose chain stitches. The second column is worked afterwards, using the leftover (slack) yarn from the first column. That's why you have to chain so loosely - each chain has to have enough yarn in it for two stitches.
It may seem like a crazy method, but the result is a true I-cord, identical in structure to its knitted counterpart, and much easier (for crocheters) to produce.
Could this technique work with more than 2 stitches? Yes - but it's rather awkward, due to the amount of slack yarn required. (There may or may not be a future blog post about this. But after extensive experimentation, I can confidently say that for 3-stitch or larger I-cord, the established methods are probably the best.)
In short, Crazy Simple I-cord is a great little technique to add to your crochet repertoire. Try it for yourself and let me know what you think. (Be sure to play around with different hook sizes to get the results you want.)
~
Oops! I nearly left out the Bonus Technique:
Super-Sturdy Mock I-Cord
Follow directions in Step 1, above. Then work Step 2 in reverse, starting at the working loop end, and going back towards the yarn tail. That's it!
Mock I-cord looks like regular I-cord on two sides only - the other two sides look something like a jewelry chain. It's less stretchy than regular I-cord, and, if worked to a moderate tension in Step 1, can be amazingly firm. It resists ravelling (in fact it can be very difficult to unravel - you've been warned!). The only real downside is that you get what you get: there's no lengthening process for a Mock I-cord. So make a good long chain in Step 1, and remember that it will shorten up considerably in Step 2.

Happy crocheting and I-cording!
P.S. Almost forgot the video too.... :)
~ ~ ~ ~ ~ ~ ~ ~ ~ ~ ~ ~
Whaaaaaaat??? This is so crazy and simple. What an awesome technique! I can't wait to try this. Thanks so much for sharing - and because of how the technique works it's perfect for variegated yarn as well.
ReplyDeleteAmazing!!! So simple. Thank you so much for telling us about this.
ReplyDeleteBlessings,
Betsy
You clever thing you!, thank you for sharing I must have a play with this.
ReplyDeleteI love: "To increase tension, try: Thinking about American politics" What a hoot! BTW I love these methods! An alternative to foundation single crochet (FSC)! Thank you (hugs to you from Australia!)
ReplyDeleteI admire how you figure this stuff out and then share it with us! I will give that a try. ((hugs)), Teresa :-)
ReplyDeleteSue, you are a GENIUS and funny too, as if American politics could make anyone tense! HA!
ReplyDelete:-) Happy crocheting!
ReplyDeleteHi Sue! :) Glad you found to time to say hi and also share this amazing simple pattern! Thank you so much:)
ReplyDeleteYou are amazing Sue, how do you figure all of this out? I would just be struggling and would probably just toss it to the side and start something else. Hope you are well, you have been missed.
ReplyDeleteHave I ever told you that you're a genius? An absolute genius. You and Vashti Braha. If I thought about American politics while doing this, I'd probably break the yarn. Most likely the hook too.
ReplyDeleteVery cool! I'll have to try this next time I do a baby hat!!!
ReplyDeleteOmg!!! This is Awesomesauce..fabulous just fabulous. So happy I found you! Thank you..Thank you. Thank you!!!
ReplyDeleteOmg!!! This is Awesomesauce..fabulous just fabulous. So happy I found you! Thank you..Thank you. Thank you!!!
ReplyDeleteYou're welcome (times six)! :D
Delete