
1. A portmanteau word, formed by combining Scallop with Calliope.
2. A cosy new hat pattern from Mrs. M...

...who really wanted to call this pattern Calliope, or Carousel, or Merry-Go-Round. But these excellent names were already taken, so something new was indicated - and Scalliope it is. I rather like it.
Scalliope features a Stretchy Star Stitch crown, with a unique oval starting method that creates a flat, almost undetectable center. The distinctive band is made from quick and easy half-double crochets worked into the back bar for extra texture and warmth.

My Scalliope has already passed some extreme wind-chill tests - these stitches give a lot of insulation!
Front post stitches, worked at intervals, coax the band into soft scallops...

...and also provide a handy place to tuck some tiny embellishments.

Scalliope Hat
Sizes:
S/M (fits up to 21½")
M/L (fits up to 23½")
Size may be easily adjusted up or down by increasing or decreasing crown rounds.
Yarn Requirements:
About 200 yards of worsted weight yarn
Small amounts of worsted or dk weight yarn for embellishment
Gauge:
Stretchy Star Stitch: 3 stars and 3 rows per inch
Scalloped Band: 12 sts = 3-1/4"
Notions:
Marker or yarn scrap
Darning needle
Yarn I Used: NaturallyCaron Country (now discontinued, alas)
How Did the Yarn Behave?
Beautifully as always - glossy, smooth, frogs easily, great stitch definition. I still can't believe they discontinued this wonderful yarn. (Caron, are you listening?)
Hook Sizes:
For crown: US I/9, 5.5mm, or hook that will give gauge
For band: US H/8, 5mm hooks, or hook that will give gauge
For tiny bows, US F/5, 3.75mm (for worsted weight yarn) OR US D/3, 3.25mm hook (for dk weight yarn)
All crochet terminology is American.
Special Stitches Used:
Forward Loop Chain (forlp ch): Cast forward loop onto hook above working loop; yarn over and draw through all loops on hook. Click here for photo/video tutorial.
Stretchy Star Stitch (stretchy str): Chain 2, ins hook in back loop of 2nd ch from hook, yo and pull up a loop, ins hook in bottom ridge loop of same ch, yo and pull up a loop (3 lps on hook), ins hook in next stitch, yo and immediately draw through all lps on hook. Click here for photo/video tutorial.
Single crochet 2 together (sc2tog): Insert hook into indicated stitch, yarn over and pull up a loop, insert hook into next stitch, yarn over and pull up a loop, yarn over and pull through all loops on hook.
Dropped Half-Double Crochet (dropped hdc): Yarn over and insert hook, from bottom to top, through top strands of indicated stitch 2 rows below; complete hdc as usual, skip next st of current row.
Front Post Half-Double Crochet (fphdc): Yarn over and insert hook from right to left (or if you're crocheting lefthanded, from left to right) through indicated stitch; complete hdc as usual, skip next st of current row.
Scalliope Hat Crochet Shorthand Pattern
RS facing at all times.
Crown (worked spiral):
Starting with slipknot, forlp ch 3. Do not turn.
Round 1: Rotating work to right, stretchy str in each back ridge across (3 stars), rotate work to right again, stretchy str in each st across (3 stars) = 6 stars total. Place marker to indicate round end. Do not join. Work will look oval-shaped.
Round 2: 2 stretchy stars in each st around = 12 stars.
Round 3: *2 stretchy stars in next star, 1 stretchy star in next star. Repeat from * around = 18 stars.
Following Rounds: Increase by 6 stars each round until hat is 54 (60) stars around, moving marker up with each round.
Work even for 7 rounds.
Note: Crown will seem very loose, but will tighten up as band is stitched.
Band (worked in joined rounds):
Notes: Band Round 1 is worked in the top strands of the stretchy stars AND in the spaces between stretchy stars. (See phototutorial below.) Round 1 must result in a multiple of 6 stitches. If you have increased or decreased hat size, adjust Round 1 accordingly.
Switch to smaller hook.
Band Round 1, Size S/M: Sl st in top strands of next stretchy str to join, ch 1; starting in same st, *hdc, hdc in sp after star, (sc2tog in next stretchy str and next sp) twice. Rep from * around = 72 sts.
Band Round 1, Size M/L: Sl st to next stretchy str to join, ch 1; starting in same st, *hdc, hdc in sp after star, (sc2tog in next stretchy str and next sp) twice*. Rep from * to * 8 times, (hdc in next star, hdc in next sp) twice. Rep from * to * until 2 stars remain, (hdc in next star, hdc in next sp) twice = 84 sts.
Band Round 2: Sl st to join, ch 1; starting in same st and working in back bars, hdc around = 72 (84) sts.
Band Round 3: Sl st to join, ch 1; starting in same st, *hdc in back bar of next 5 sts, dropped hdc in top strands of hdc 2 rows below. Rep from * 11 (12) times = 72 (84) sts.
Band Rounds 4-5: Rep Band Round 2.
Band Round 6: Sl st to join, ch 1; starting in same st, *hdc in back bar of next 5 sts, fphdc in dropped hdc 2 rows below. Rep from * 11 (12) times = 72 (84) sts.
Band Rounds 7-8: Rep Band Round 2.
Band Round 9: Sl st to join, ch 1; starting in same st, *sc in back bar of next 2 sts, hdc in back bar, sc in back bar of next 2 sts, fphdc in fphdc 2 rows below. Rep from * 11 (12) times = 72 (84) sts. Sl st to join.
Cut yarn and weave in ends. May block if desired.
Optional Tiny Bow
Use a smaller than usual hook for your yarn, and very firm tension.
Leaving 4-6" tail, knotless chain 4, tr in back lp of 1st ch, ch 3, sl st in same lp (first half complete), ch 3, tr in same sp, ch 3, sl st in same sp. Cut yarn, leaving 4-6" tail, and pull up and out of loop. Wrap both tails (in opposite directions) once around front of bow and to back; knot to secure. Yarn tails may be woven in, or left long and pulled to reverse side of hat for greater security.
Make 3 bows; tuck into dropped hdc and fphdcs at band round ends (to cover joins).
Scalliope Hat Crochet Pattern in Mostly Plain English, with Photos
Don't forget to look at the Special Stitches above.
Right side will be facing you at all times.
Crown (worked spiral):
Starting with slipknot, forward loop chain 3 (click here for Forward Loop Chain photo/video tutorial). Do not turn.
Your next stitches will be made into the back ridges of the forward loop chain, indicated here by arrows:

Round 1: Stretchy star (click here for Stretchy Star photo/video tutorial) in each back ridge across (3 stars)...

...rotate work to right,
stretchy star in each stitch across (3 stars).
Your hook will be going into the same space as it did on the other side of the row - how easy is that?
Now you should have 6 stars, shaped like an oval:

Do not join - we will be working in a spiral. Now is a good time to place your stitch marker so you know where the rounds start and end. (I was working without a marker, and I paid for it a couple of rounds later. No photos, but believe me some frogging went on! After that I used a marker.)
Round 2: Make 2 stretchy stars in each star around = 12 stars. Notice how the shape is becoming circular:

Now we'll be increasing 6 stars every round. (Sorry, but I didn't take any photos of this bit.)
Round 3: *2 stretchy stars in next star, 1 stretchy star in next star.
Repeat from * around = 18 stars.
Round 4: *2 stretchy stars in next star, 1 stretchy star in each of next 2 stars. Repeat from * around = 24 stars.
Following Rounds: Increase as above by 6 stars each round (another way to describe it is to add 1 extra star between increases on each round).
Keep increasing on each round until hat is 54 (60) stars around, moving marker up with each round.
Then work 7 rounds even (no increases).
Your crown should now be about 5-1/4" (5-3/4") long from center to edge.
Don't worry if the hat seems very loose - it will tighten up as you stitch the band.
Band (worked in joined rounds):
Important Notes:
All Sizes: Slip stitch to next stretchy star.

Remember, you'll be working into the top strands of each star AND into the spaces between each star:

Band Round 1, Size S/M only:
Chain 1.
*Hdc in same stitch,
hdc in space after star,
sc 2 together in next stretchy star and next space,
sc 2 together in next stretchy star and next space.
(You have just turned 3 stars into 4 stitches.)
Repeat from * around = 72 stitches.

Band Round 1, Size M/L only:
Chain 1,
*hdc in same stitch,
hdc in space after star,
sc 2 together in next stretchy star and next space,
sc 2 together in next stretchy star and next space.*
Repeat from * to * 8 times - you should be about halfway around the crown.
Now for a funky increase:
hdc in next star,
hdc in next space,
hdc in next star,
hdc in next space.
(The funky increase will help give you a multiple of 6 at the end of the round.)
Now we return to our regular stitch pattern:
repeat from * to * again until you have 2 stars left, then:
hdc in next star,
hdc in next space,
hdc in next star,
hdc in next space.
You should now have 84 stitches in your round.
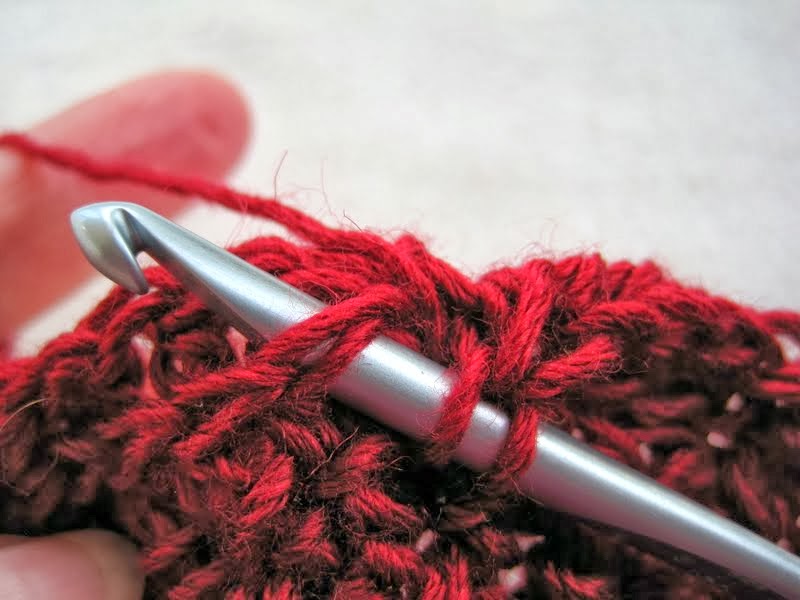
Note: In the following rounds, nearly all the stitches will be worked into the back bars of the previous round's stitches. To find the back bar, tip the edge towards you. The back bar is the horizonal strand that runs just beneath the back loop:

starting in same stitch and working in back horizontal strands,
hdc around = 72 (84) sts.
You can see how working in the back bar tips the top of the previous row forward:

On to Round 3!
Band Round 3:
Slip stitch to join,
chain 1;
starting in same stitch: *hdc in back bar of next 5 stitches,
dropped hdc in top strands of hdc 2 rows below.
Repeat from * 11 (12) times = 72 (84) stitches.
Here's where you'll make your dropped hdc:


Tip: After you make your dropped hdc, don't forget to skip over a stitch in the current row. The stitch you skip will be right behind the dropped hdc. Resume stitching in the next stitch after this one. This will keep your stitch count even.
Band Rounds 4-5: Repeat Band Round 2.
Band Round 6:
Slip stitch to join,
Chain 1;
starting in same stitch, *hdc in back bar of next 5 stitches,
Front Post hdc in dropped hdc 2 rows below.
Repeat from * 11 (12) times = 72 (84) sts.


Getting more scallop-y! (Scallopier?)
Band Rounds 7-8: Repeat Band Round 2.
And here we are at the last round!
Band Round 9:
Slip stitch to join,
chain 1;
starting in same stitch:
*sc in back bar of next 2 stitches,
hdc in next back bar,
sc in back bar of next 2 stitches,
front post hdc in front post hdc 2 rows below.
Repeat from * 11 (12) times = 72 (84) stitches.
Join with slip stitch.
Pause for a moment to admire those lovely scallops:

Then cut yarn and weave in ends. You may block the hat if you like, but it probably won't need it. :)
Optional Tiny Bows
Use a smaller than usual hook for your yarn, and very firm tension.
Leaving a 4-6" tail, knotless chain 4,
treble crochet back loop of 1st chain,
chain 3,
slip stitch in same loop (first half complete),


chain 3,
treble crochet in center space,
chain 3,
slip stitch in same space.

Cut yarn, leaving a 4-6" tail. Pull yarn end up and out of loop.
Wrap both tails (in opposite directions) once around front of bow and to back; knot to secure. Yarn tails may be woven in, or left long and pulled to reverse side of hat for greater security.


Tuck the little bow into your hat band, under the dropped hdc at the end of the band round. (You can tuck it anywhere, but here it will cover the slightly bumpy join).

If you like it, make a few more and play with the colour arrangement. Or you can make them all the same colour. I chose these shades to match my winter jacket:

You can customise your hat band all sorts of ways - try crocheting it in stripes, with a single colour button or bow for trim. Or string little chain-stitch or tiny bobble garlands from one post stitch to the next. Decorate it with a brooch or a single large button. Or try something funky like this:
Front post stitches, worked at intervals, coax the band into soft scallops...

...and also provide a handy place to tuck some tiny embellishments.

Scalliope Hat
Sizes:
S/M (fits up to 21½")
M/L (fits up to 23½")
Size may be easily adjusted up or down by increasing or decreasing crown rounds.
Yarn Requirements:
About 200 yards of worsted weight yarn
Small amounts of worsted or dk weight yarn for embellishment
Gauge:
Stretchy Star Stitch: 3 stars and 3 rows per inch
Scalloped Band: 12 sts = 3-1/4"
Notions:
Marker or yarn scrap
Darning needle
Yarn I Used: NaturallyCaron Country (now discontinued, alas)
How Did the Yarn Behave?
Beautifully as always - glossy, smooth, frogs easily, great stitch definition. I still can't believe they discontinued this wonderful yarn. (Caron, are you listening?)
Hook Sizes:
For crown: US I/9, 5.5mm, or hook that will give gauge
For band: US H/8, 5mm hooks, or hook that will give gauge
For tiny bows, US F/5, 3.75mm (for worsted weight yarn) OR US D/3, 3.25mm hook (for dk weight yarn)
All crochet terminology is American.
Special Stitches Used:
Forward Loop Chain (forlp ch): Cast forward loop onto hook above working loop; yarn over and draw through all loops on hook. Click here for photo/video tutorial.
Stretchy Star Stitch (stretchy str): Chain 2, ins hook in back loop of 2nd ch from hook, yo and pull up a loop, ins hook in bottom ridge loop of same ch, yo and pull up a loop (3 lps on hook), ins hook in next stitch, yo and immediately draw through all lps on hook. Click here for photo/video tutorial.
Single crochet 2 together (sc2tog): Insert hook into indicated stitch, yarn over and pull up a loop, insert hook into next stitch, yarn over and pull up a loop, yarn over and pull through all loops on hook.
Dropped Half-Double Crochet (dropped hdc): Yarn over and insert hook, from bottom to top, through top strands of indicated stitch 2 rows below; complete hdc as usual, skip next st of current row.
Front Post Half-Double Crochet (fphdc): Yarn over and insert hook from right to left (or if you're crocheting lefthanded, from left to right) through indicated stitch; complete hdc as usual, skip next st of current row.
Scalliope Hat Crochet Shorthand Pattern
RS facing at all times.
Crown (worked spiral):
Starting with slipknot, forlp ch 3. Do not turn.
Round 1: Rotating work to right, stretchy str in each back ridge across (3 stars), rotate work to right again, stretchy str in each st across (3 stars) = 6 stars total. Place marker to indicate round end. Do not join. Work will look oval-shaped.
Round 2: 2 stretchy stars in each st around = 12 stars.
Round 3: *2 stretchy stars in next star, 1 stretchy star in next star. Repeat from * around = 18 stars.
Following Rounds: Increase by 6 stars each round until hat is 54 (60) stars around, moving marker up with each round.
Work even for 7 rounds.
Note: Crown will seem very loose, but will tighten up as band is stitched.
Band (worked in joined rounds):
Notes: Band Round 1 is worked in the top strands of the stretchy stars AND in the spaces between stretchy stars. (See phototutorial below.) Round 1 must result in a multiple of 6 stitches. If you have increased or decreased hat size, adjust Round 1 accordingly.
Switch to smaller hook.
Band Round 1, Size S/M: Sl st in top strands of next stretchy str to join, ch 1; starting in same st, *hdc, hdc in sp after star, (sc2tog in next stretchy str and next sp) twice. Rep from * around = 72 sts.
Band Round 1, Size M/L: Sl st to next stretchy str to join, ch 1; starting in same st, *hdc, hdc in sp after star, (sc2tog in next stretchy str and next sp) twice*. Rep from * to * 8 times, (hdc in next star, hdc in next sp) twice. Rep from * to * until 2 stars remain, (hdc in next star, hdc in next sp) twice = 84 sts.
Band Round 2: Sl st to join, ch 1; starting in same st and working in back bars, hdc around = 72 (84) sts.
Band Round 3: Sl st to join, ch 1; starting in same st, *hdc in back bar of next 5 sts, dropped hdc in top strands of hdc 2 rows below. Rep from * 11 (12) times = 72 (84) sts.
Band Rounds 4-5: Rep Band Round 2.
Band Round 6: Sl st to join, ch 1; starting in same st, *hdc in back bar of next 5 sts, fphdc in dropped hdc 2 rows below. Rep from * 11 (12) times = 72 (84) sts.
Band Rounds 7-8: Rep Band Round 2.
Band Round 9: Sl st to join, ch 1; starting in same st, *sc in back bar of next 2 sts, hdc in back bar, sc in back bar of next 2 sts, fphdc in fphdc 2 rows below. Rep from * 11 (12) times = 72 (84) sts. Sl st to join.
Cut yarn and weave in ends. May block if desired.
Optional Tiny Bow
Use a smaller than usual hook for your yarn, and very firm tension.
Leaving 4-6" tail, knotless chain 4, tr in back lp of 1st ch, ch 3, sl st in same lp (first half complete), ch 3, tr in same sp, ch 3, sl st in same sp. Cut yarn, leaving 4-6" tail, and pull up and out of loop. Wrap both tails (in opposite directions) once around front of bow and to back; knot to secure. Yarn tails may be woven in, or left long and pulled to reverse side of hat for greater security.
Make 3 bows; tuck into dropped hdc and fphdcs at band round ends (to cover joins).
Scalliope Hat Crochet Pattern in Mostly Plain English, with Photos
Don't forget to look at the Special Stitches above.
Right side will be facing you at all times.
Crown (worked spiral):
Starting with slipknot, forward loop chain 3 (click here for Forward Loop Chain photo/video tutorial). Do not turn.
Your next stitches will be made into the back ridges of the forward loop chain, indicated here by arrows:

Round 1: Stretchy star (click here for Stretchy Star photo/video tutorial) in each back ridge across (3 stars)...

...rotate work to right,
stretchy star in each stitch across (3 stars).
Your hook will be going into the same space as it did on the other side of the row - how easy is that?
Now you should have 6 stars, shaped like an oval:

Do not join - we will be working in a spiral. Now is a good time to place your stitch marker so you know where the rounds start and end. (I was working without a marker, and I paid for it a couple of rounds later. No photos, but believe me some frogging went on! After that I used a marker.)

Now we'll be increasing 6 stars every round. (Sorry, but I didn't take any photos of this bit.)
Round 3: *2 stretchy stars in next star, 1 stretchy star in next star.
Repeat from * around = 18 stars.
Round 4: *2 stretchy stars in next star, 1 stretchy star in each of next 2 stars. Repeat from * around = 24 stars.
Following Rounds: Increase as above by 6 stars each round (another way to describe it is to add 1 extra star between increases on each round).
Keep increasing on each round until hat is 54 (60) stars around, moving marker up with each round.
Then work 7 rounds even (no increases).
Your crown should now be about 5-1/4" (5-3/4") long from center to edge.
Don't worry if the hat seems very loose - it will tighten up as you stitch the band.
Band (worked in joined rounds):
Important Notes:
- Band Round 1 is worked in both the top strands of the stretchy stars AND in the spaces BETWEEN stretchy stars. (See photo below.)
- Round 1 MUST result in a multiple of 6 stitches.
- If you have increased or decreased hat size, adjust Round 1 accordingly so you end up with a multiple of 6.
All Sizes: Slip stitch to next stretchy star.

Remember, you'll be working into the top strands of each star AND into the spaces between each star:

Band Round 1, Size S/M only:
Chain 1.
*Hdc in same stitch,
hdc in space after star,
sc 2 together in next stretchy star and next space,
sc 2 together in next stretchy star and next space.
(You have just turned 3 stars into 4 stitches.)
Repeat from * around = 72 stitches.

Band Round 1, Size M/L only:
Chain 1,
*hdc in same stitch,
hdc in space after star,
sc 2 together in next stretchy star and next space,
sc 2 together in next stretchy star and next space.*
Repeat from * to * 8 times - you should be about halfway around the crown.
Now for a funky increase:
hdc in next star,
hdc in next space,
hdc in next star,
hdc in next space.
(The funky increase will help give you a multiple of 6 at the end of the round.)
Now we return to our regular stitch pattern:
repeat from * to * again until you have 2 stars left, then:
hdc in next star,
hdc in next space,
hdc in next star,
hdc in next space.
You should now have 84 stitches in your round.
Note: In the following rounds, nearly all the stitches will be worked into the back bars of the previous round's stitches. To find the back bar, tip the edge towards you. The back bar is the horizonal strand that runs just beneath the back loop:

Band Round 2:
Slip stitch to join,
chain 1;Slip stitch to join,
starting in same stitch and working in back horizontal strands,
hdc around = 72 (84) sts.
You can see how working in the back bar tips the top of the previous row forward:

On to Round 3!
Band Round 3:
Slip stitch to join,
chain 1;
starting in same stitch: *hdc in back bar of next 5 stitches,
dropped hdc in top strands of hdc 2 rows below.
Repeat from * 11 (12) times = 72 (84) stitches.
Here's where you'll make your dropped hdc:


Tip: After you make your dropped hdc, don't forget to skip over a stitch in the current row. The stitch you skip will be right behind the dropped hdc. Resume stitching in the next stitch after this one. This will keep your stitch count even.
Band Rounds 4-5: Repeat Band Round 2.
Band Round 6:
Slip stitch to join,
Chain 1;
starting in same stitch, *hdc in back bar of next 5 stitches,
Front Post hdc in dropped hdc 2 rows below.
Repeat from * 11 (12) times = 72 (84) sts.


Getting more scallop-y! (Scallopier?)
Band Rounds 7-8: Repeat Band Round 2.
And here we are at the last round!
Band Round 9:
Slip stitch to join,
chain 1;
starting in same stitch:
*sc in back bar of next 2 stitches,
hdc in next back bar,
sc in back bar of next 2 stitches,
front post hdc in front post hdc 2 rows below.
Repeat from * 11 (12) times = 72 (84) stitches.
Join with slip stitch.
Pause for a moment to admire those lovely scallops:

Then cut yarn and weave in ends. You may block the hat if you like, but it probably won't need it. :)
Optional Tiny Bows
Use a smaller than usual hook for your yarn, and very firm tension.
Leaving a 4-6" tail, knotless chain 4,
treble crochet back loop of 1st chain,
chain 3,
slip stitch in same loop (first half complete),


chain 3,
treble crochet in center space,
chain 3,
slip stitch in same space.

Cut yarn, leaving a 4-6" tail. Pull yarn end up and out of loop.
Wrap both tails (in opposite directions) once around front of bow and to back; knot to secure. Yarn tails may be woven in, or left long and pulled to reverse side of hat for greater security.


Tuck the little bow into your hat band, under the dropped hdc at the end of the band round. (You can tuck it anywhere, but here it will cover the slightly bumpy join).

If you like it, make a few more and play with the colour arrangement. Or you can make them all the same colour. I chose these shades to match my winter jacket:

You can customise your hat band all sorts of ways - try crocheting it in stripes, with a single colour button or bow for trim. Or string little chain-stitch or tiny bobble garlands from one post stitch to the next. Decorate it with a brooch or a single large button. Or try something funky like this:

The possibilities are endless. :)
~ ~ ~
You may do whatever you like with the items you make from this pattern, but you may not sell the pattern or reproduce the text without permission. Links to this post are always welcome. If you have any questions or find any mistakes in the pattern, please leave a comment below (or you can contact me in Ravelry).
Thanks for viewing, and happy crocheting!
P.S. Don't forget to enter the Grateful Giveaway (open until December 8, 2013), for a chance to win a special crochet, knit, or sewing magazine from Interweave Press (also some chocolate and as-yet-unrevealed goodies).
~ ~ ~ ~ ~ ~ ~ ~ ~ ~ ~ ~


